Monday, December 28, 2009

Common Dialogs Allow A professional VB app

The Common Dialog control provides a standard set of dialog boxes for operations such as opening, saving, and printing files, as well as selecting colors and fonts and displaying help. Any six of the different dialog boxes can be displayed with just one Common Dialog control. A particular dialog box is displayed by using one of the six "Show..." methods of the Common Dialog control: ShowOpen, ShowSave, ShowPrinter, ShowColor, ShowFont, or ShowHelp.


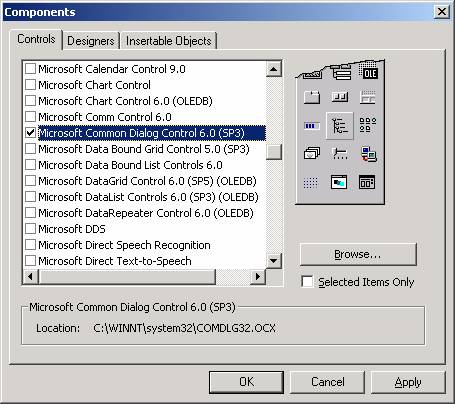
The Common Dialog control not an intrinsic control; rather, it is an "Active X" control that must be added to the toolbox via the Components dialog box, as shown below. This dialog box is accessed via the Project menu, Components item. Once you check "Microsoft Common Dialog Control 6.0" and click OK, the control is added to your toolbox (also shown below, circled). Then you can double-click it to make it appear on your form, as you would with any other control. The Common Dialog control is not visible at run-time.


Certain functionality for the dialog boxes is provided automatically by VB and Windows, but other functionality must be coded. For example, with the Open and Save dialog boxes, the functionality to navigate to different drives and directories is built in, but the functionality to actually save or open a file must be coded in your program.


The sample program for this topic will be presented shortly, but first, two properties of the Common Dialog control, Flags and CancelError, will be discussed briefly.


The Flags Property

The appearance and behavior of the dialog boxes can be modified to some degree with the Flags property of the Common Dialog control. Wherever possible, you should use the Flags property to control the appearance of the dialog box in question such that you only present features to the user that your application supports. Examples follow.

(1) Shown below is a screen shot of the Open Common Dialog Box. Note that the item "Open as read only" is circled. You can use the Flags property to suppress this item (you should only show it if your application will let the user decide whether or not to open the file as read-only).


2) Shown below is a screen shot of the Print Common Dialog Box. Note that the circled items in the "Page Range" area (for printing a selection or a specific page range) are grayed out. These items were disabled via Flags property settings. You should only enable such options if your program contains the logic to act on them.


(3) Shown below is a screen shot of the Font Common Dialog Box. The Flags property can control whether or not the "Effects" area (circled) is displayed


The CancelError Property


In order to test whether or not the user clicked the Cancel button on a Common Dialog box, you must set up special error-handling logic. If you don't, VB will treat the clicking of the Cancel button as an unhandled error and will thus cause your program to end abruptly (this will not exactly endear you to your users).


You can test to see whether or not the user clicked the Cancel button by setting the CancelError property to True – this causes an error routine you have written (using the "On Error Goto label technique) to be executed when the user clicks Cancel.


The basic structure of a VB procedure that displays a Common Dialog box should be as follows:


Private Sub WHATEVER()


DECLARE LOCAL VARIABLES


ON ERROR GOTO CANCELERROR_ROUTINE


SET CancelError PROPERTY TO TRUE (e.g., CommonDialog1.CancelError = True)

SET Flags AND OTHER PROPERTIES TO APPROPRIATE VALUES

SHOW THE COMMON DIALOG (e.g., CommonDialog1.ShowSave)


' When you show the common dialog box, processing is suspending until the

' user performs an action. If they click the Cancel button, VB will jump

' to the error-handling routine you set up (i.e., CANCELERROR_ROUTINE).


' Assuming the user did not click Cancel, continue processing below ...


' Now that the dialog box is done being shown, we can put a "normal" error-

' handling routine in place, if desired ...

On Error GoTo NORMAL_ERROR_ROUTINE


NORMAL PROCESSING HERE


' Exit here so that you don't fall through to the error-handling logic

Exit Sub


NORMAL_ERROR_ROUTINE:

MsgBox "Err # " & Err.Number & " - " & Err.Description, vbCritical, "Error"

Exit Sub


CANCELERROR_ROUTINE:

' Do nothing, no problem if user clicks Cancel button ...

End Sub


COMMON DIALOG DEMO PROGRAM


The Common Dialog demo program shows how to use each of the six types of dialog boxes. The design-time form is shown below, with the names and property settings for each control on the form, as well as for the form itself, shown in callouts.


more detail Click this link
http://www.vb6.us/tutorials/common-dialogs-vb-tutorial

Thursday, August 27, 2009

for next loop

The For...Next Loop
The For...Next Loop is another way to make loops in Visual Basic. For...Next repetition structure handles all the details of counter-controlled repetition. The following loop counts the numbers from 1 to 100:

Dim x As Integer
For x = 1 To 50
Print x
Next

In order to count the numbers from 1 yo 50 in steps of 2, the following loop can be used

For x = 1 To 50 Step 2
Print x
Next

The following loop counts numbers as 1, 3, 5, 7..etc

The above coding will display numbers vertically on the form. In order to display numbers horizontally the following method can be used.

For x = 1 To 50
Print x & Space$ (2);
Next

To increase the space between the numbers increase the value inside the brackets after the & Space$.

Following example is a For...Next repetition structure which is with the If condition used.

Dim number As Integer
For number = 1 To 10
If number = 4 Then
Print "This is number 4"
Else
Print number
End If
Next

In the output instead of number 4 you will get the "This is number 4".

Loop in Visual basic

The Do While...Loop is used to execute statements until a certain condition is met. The following Do Loop counts from 1 to 100.
Dim number As Integer
number = 1
Do While number <= 100
number = number + 1
Loop

A variable number is initialized to 1 and then the Do While Loop starts. First, the condition is tested; if condition is True, then the statements are executed. When it gets to the Loop it goes back to the Do and tests condition again. If condition is False on the first pass, the statements are never executed.

While... Wend Statement
A While...Wend statement behaves like the Do While...Loop statement. The following While...Wend counts from 1 to 100

Dim number As Integer

number = 1
While number <=100
number = number + 1
Wend

Do...Loop While Statement
The Do...Loop While statement first executes the statements and then test the condition after each execution. The following program block illustrates the structure:

Dim number As Long
number = 0
Do
number = number + 1
Loop While number < 201

The programs executes the statements between Do and Loop While structure in any case. Then it determines whether the counter is less than 501. If so, the program again executes the statements between Do and Loop While else exits the Loop.

Do Until...Loop Statement
Unlike the Do While...Loop and While...Wend repetition structures, the Do Until... Loop structure tests a condition for falsity. Statements in the body of a Do Until...Loop are executed repeatedly as long as the loop-continuation test evaluates to False.

An example for Do Until...Loop statement. The coding is typed inside the click event of the command button

Dim number As Long
number=0
Do Until number > 1000
number = number + 1
Print number
Loop

Numbers between 1 to 1000 will be displayed on the form as soon as you click on the command button.

Tuesday, August 25, 2009

DriveListBox, DirListBox, and FileListBox Controls in vb 6

Three of the controls on the ToolBox let you access the computer's file system. They are DriveListBox, DirListBox and FileListBox controls (see below figure) , which are the basic blocks for building dialog boxes that display the host computer's file system. Using these controls, user can traverse the host computer's file system, locate any folder or files on any hard disk, even on network drives. The files are controls are independent of one another, and each can exist on it's own, but they are rarely used separately. The files controls are described next.

In a nutshell, the DriveListBox control is a combobox-like control that's automatically filled with your drive's letters and volume labels. The DirListBox is a special list box that displays a directory tree. The FileListBox control is a special-purpose ListBox control that displays all the files in a given directory, optionally filtering them based on their names, extensions, and attributes.

These controls often work together on the same form; when the user selects a drive in a DriveListBox, the DirListBox control is updated to show the directory tree on that drive. When the user selects a path in the DirListBox control, the FileListBox control is filled with the list of files in that directory. These actions don't happen automatically, however—you must write code to get the job done.

After you place a DriveListBox and a DirListBox control on a form's surface, you usually don't have to set any of their properties; in fact, these controls don't expose any special property, not in the Properties window at least. The FileListBox control, on the other hand, exposes one property that you can set at design time—the Pattern property. This property indicates which files are to be shown in the list area: Its default value is *.* (all files), but you can enter whatever specification you need, and you can also enter multiple specifications using the semicolon as a separator. You can also set this property at run time, as in the following line of code:

File1.Pattern = "*.txt;*.doc;*.rtf"

Following figure shows three files controls are used in the design of Forms that let users explore the entire structure of their hard disks.


DriveListBox : Displays the names of the drives within and connected to the PC. The basic property of this control is the drive property, which set the drive to be initially selected in the control or returns the user's selection.

DirListBox : Displays the folders of current Drive. The basic property of this control is the Path property, which is the name of the folder whose sub folders are displayed in the control.

FileListBox : Displays the files of the current folder. The basic property of this control is also called Path, and it's the path name of the folder whose files are displayed.

The three File controls are not tied to one another. If you place all three of them on a Form, you will see the names of all the folders under the current folder, and so on. Each time you select a folder in the DirlistBox by double clicking its name, its sub folders are displayed. Similarly , the FileListBox control will display the names of all files in the current folder. Selecting a drive in the DriveListBox control, however this doesn't affect the contents of the DirListBox.

To connect to the File controls, you must assign the appropriate values to the properties. To compel the DirListBox to display the folders of the selected drive in the DriveListBox, you must make sure that each time the user selects another drive, the Path property of the DirListBox control matches the Drive property of the DriveListBox.

After these preliminary steps, you're ready to set in motion the chain of events. When the user selects a new drive in the DriveListBox control, it fires a Change event and returns the drive letter (and volume label) in its Drive property. You trap this event and set the DirListBox control's Path property to point to the root directory of the selected drive:

Private Sub Drive1_Change()
' The Drive property also returns the volume label, so trim it.
Dir1.Path = Left$(Drive1.Drive, 1) & ":\"
End Sub

When the user double-clicks on a directory name, the DirListBox control raises a Change event; you trap this event to set the FileListBox's Path property accordingly:

Private Sub Dir1_Change()
File1.Path = Dir1.Path
End Sub

Finally, when the user clicks on a file in the FileListBox control, a Click event is fired (as if it were a regular ListBox control), and you can query its Filename property to learn which file has been selected. Note how you build the complete path:

Filename = File1.Path
If Right$(Filename, 1) <> "\" Then Filename = Filename & "\"
Filename = Filename & File1.Filename

The DirListBox and FileListBox controls support most of the properties typical of the control they derive from—the ListBox control—including the ListCount and the ListIndex properties and the Scroll event. The FileListBox control supports multiple selection; hence you can set its MultiSelect property in the Properties window and query the SelCount and Selected properties at run time.

The FileListBox control also exposes a few custom Boolean properties, Normal, Archive, Hidden, ReadOnly, and System, which permit you to decide whether files with these attributes should be listed. (By default, the control doesn't display hidden and system files.) This control also supports a couple of custom events, PathChange and PatternChange, that fire when the corresponding property is changed through code. In most cases, you don't have to worry about them, and I won't provide examples of their usage.

The problem with the DriveListBox, DirListBox and FileListBox controls is that they're somewhat outdated and aren't used by most commercial applications any longer. Moreover, these controls are known to work incorrectly when listing files on network servers and sometimes even on local disk drives, especially when long file and directory names are used. For this reason, I discourage you from using them and suggest instead that you use the Common Dialog controls for your FileOpen and FileSave dialog boxes. But if you need to ask the user for the name of a directory rather than a file, you're out of luck because—while Windows does include such a system dialog box, named BrowseForFolders dialog—Visual Basic still doesn't offer a way to display it (unless you do some advanced API programming). Fortunately, Visual Basic 6 comes with a new control—the ImageCombo control—that lets you simulate the appearance of the DriveListBox control. It also offers you a powerful library—the FileSystemObject library—that completely frees you from using these three controls, if only as hidden controls that you use just for quickly retrieving information on the file system.

Label

Label and Frame controls have a few features in common, so it makes sense to explain them together. First they're mostly "decorative" controls that contribute to the user interface but are seldom used as programmable objects. In other words, you often place them on the form and arrange their properties as your user interface needs dictate, but you rarely write code to serve their events, generally, or manipulate their properties at run time.

Label Controls
Most people use Label controls to provide a descriptive caption and possibly an associated hot key for other controls, such as TextBox, ListBox, and ComboBox, that don't expose the Caption property. In most cases, you just place a Label control where you need it, set its Caption property to a suitable string (embedding an ampersand character in front of the hot key you want to assign), and you're done. Caption is the default property for Label controls. Be careful to set the Label's TabIndex property so that it's 1 minus the TabIndex property of the companion control.

Other useful properties are BorderStyle(if you want the Label control to appear inside a 3D border) and Alignment (if you want to align the caption to the right or center it on the control). In most cases, the alignment depends on how the Label control relates to its companion control: for example, if the Label control is placed to the left of its companion field, you might want to set its Alignment property to 1-Right Justify. The value 2-Center is especially useful for stand-alone Label controls.

Frame Controls

Frame Controls
Frame controls are similar to Label controls in that they can serve as captions for those controls that don't have their own. Moreover, Frame controls can also (and often do) behave as containers and host other controls. In most cases, you only need to drop a Frame control on a form and set its Caption property. If you want to create a borderless frame, you can set its BorderStyle property to 0-None.

Controls that are contained in the Frame control are said to be child controls. Moving a control at design time over a Frame control—or over any other container, for that matter—doesn't automatically make that control a child of the Frame control. After you create a Frame control, you can create a child control by selecting the child control's icon in the Toolbox and drawing a new instance inside the Frame's border. Alternatively, to make an existing control a child of a Frame control, you must select the control, press Ctrl+X to cut it to the Clipboard, select the Frame control, and press Ctrl+V to paste the control inside the Frame. If you don't follow this procedure and you simply move the control over the Frame, the two controls remain completely independent of each other, even if the other control appears in front of the Frame control.

Frame controls, like all container controls, have two interesting features. If you move a Frame control, all the child controls go with it. If you make a container control disabled or invisible, all its child controls also become disabled or invisible. You can exploit these features to quickly change the state of a group of related controls.

Frame Controls

Frame Controls
Frame controls are similar to Label controls in that they can serve as captions for those controls that don't have their own. Moreover, Frame controls can also (and often do) behave as containers and host other controls. In most cases, you only need to drop a Frame control on a form and set its Caption property. If you want to create a borderless frame, you can set its BorderStyle property to 0-None.

Controls that are contained in the Frame control are said to be child controls. Moving a control at design time over a Frame control—or over any other container, for that matter—doesn't automatically make that control a child of the Frame control. After you create a Frame control, you can create a child control by selecting the child control's icon in the Toolbox and drawing a new instance inside the Frame's border. Alternatively, to make an existing control a child of a Frame control, you must select the control, press Ctrl+X to cut it to the Clipboard, select the Frame control, and press Ctrl+V to paste the control inside the Frame. If you don't follow this procedure and you simply move the control over the Frame, the two controls remain completely independent of each other, even if the other control appears in front of the Frame control.

Frame controls, like all container controls, have two interesting features. If you move a Frame control, all the child controls go with it. If you make a container control disabled or invisible, all its child controls also become disabled or invisible. You can exploit these features to quickly change the state of a group of related controls.

OptionButton Controls in VB6

OptionButton Controls in VB6
OptionButton controls are also known as radio buttons because of their shape. You always use OptionButton controls in a group of two or more because their purpose is to offer a number of mutually exclusive choices. Anytime you click on a button in the group, it switches to a selected state and all the other controls in the group become unselected.

Preliminary operations for an OptionButton control are similar to those already described for CheckBox controls. You set an OptionButton control's Caption property to a meaningful string, and if you want you can change its Alignment property to make the control right aligned. If the control is the one in its group that's in the selected state, you also set its Valueproperty to True. (The OptionButton's Value property is a Boolean value because only two states are possible.) Value is the default property for this control.

At run time, you typically query the control's Value property to learn which button in its group has been selected. Let's say you have three OptionButton controls, named optWeekly, optMonthly, and optYearly. You can test which one has been selected by the user as follows:

If optWeekly.Value Then
' User prefers weekly frequency.
ElseIf optMonthly.Value Then
' User prefers monthly frequency.
ElseIf optYearly.Value Then
' User prefers yearly frequency.
End If

Strictly speaking, you can avoid the test for the last OptionButton control in its group because all choices are supposed to be mutually exclusive. But the approach I just showed you increases the code's readability.

A group of OptionButton controls is often hosted in a Frame control. This is necessary when there are other groups of OptionButton controls on the form. As far as Visual Basic is concerned, all the OptionButton controls on a form's surface belong to the same group of mutually exclusive selections, even if the controls are placed at the opposite corners of the window. The only way to tell Visual Basic which controls belong to which group is by gathering them inside a Frame control. Actually, you can group your controls within any control that can work as a container—PictureBox, for example—but Frame controls are often the most reasonable choice.

Monday, August 24, 2009

VB6 CommandButton

When compared to TextBox controls, these controls are really simple. Not only do they expose relatively few properties, they also support a limited number of events, and you don't usually write much code to manage them.

CommandButton Controls in VB6
Using CommandButton controls is trivial. In most cases, you just draw the control on the form's surface, set its Caption property to a suitable string (adding an & character to associate a hot key with the control if you so choose), and you're finished, at least with user-interface issues. To make the button functional, you write code in its Click event procedure, as in this fragment:

Private Sub Command1_Click()
' Save data, then unload the current form.
Call SaveDataToDisk
Unload Me
End Sub

You can use two other properties at design time to modify the behavior of a CommandButton control. You can set the Default property to True if it's the default push button for the form (the button that receives a click when the user presses the Enter key—usually the OK or Save button). Similarly, you can set the Cancel property to True if you want to associate the button with the Escape key.

The only relevant CommandButton's run-time property is Value, which sets or returns the state of the control (True if pressed, False otherwise). Value is also the default property for this type of control. In most cases, you don't need to query this property because if you're inside a button's Click event you can be sure that the button is being activated. The Value property is useful only for programmatically clicking a button:

This fires the button's Click event.
Command1.Value = True

The CommandButton control supports the usual set of keyboard and mouse events (KeyDown, KeyPress, KeyUp, MouseDown, MouseMove, MouseUp, but not the DblClick event) and also the GotFocus and LostFocus events, but you'll rarely have to write code in the corresponding event procedures.

Validation Routines for Numbers

Although trapping invalid keys in the KeyPress or KeyDown event procedures seems a great idea at first, when you throw your application to inexperienced users you soon realize that there are many ways for them to enter invalid data. Depending on what you do with this data, your application can come to an abrupt end with a run-time error or—much worse—it can appear to work correctly while it delivers bogus results. What you really need is a bullet-proof method to trap invalid values.

Before I offer you a decent solution to the problem, let me explain why you can't rely solely on trapping invalid keys for your validation chores. What if the user pastes an invalid value from the clipboard? Well, you might say, let's trap the Ctrl+V and Shift+Ins key combinations to prevent the user from doing that! Unfortunately, Visual Basic's TextBox controls offer a default edit menu that lets users perform any clipboard operation by simply right-clicking on them. Fortunately, there's a way around this problem: Instead of trapping a key before it gets to the TextBox control, you trap its effect in the Change event and reject it if it doesn't pass your test. But this makes the structure of the code a little more complex than you might anticipate:

' Form-level variables
Dim saveText As String
Dim saveSelStart As Long

Private Sub Text1_GotFocus()
' Save values when the control gets the focus.
saveText = Text1.Text
saveSelStart = Text1.SelStart
End Sub

Private Sub Text1_Change()
' Avoid nested calls.
Static nestedCall As Boolean
If nestedCall Then Exit Sub

' Test the control's value here.
If IsNumeric(Text1.Text) Then
' If value is OK, save values.
saveText = Text1.Text
saveSelStart = Text1.SelStart
Else
' Prepare to handle a nested call.
nestedCall = True
Text1.Text = saveText
nestedCall = False
Text1.SelStart = saveSelStart
End If
End Sub

Private Sub Text1_KeyUp(KeyCode As Integer, Shift As Integer)
saveSelStart = Text1.SelStart
End Sub
Private Sub Text1_MouseDown(Button As Integer, _
Shift As Integer, X As Single, Y As Single)
saveSelStart = Text1.SelStart
End Sub
Private Sub Text1_MouseMove(Button As Integer, _
Shift As Integer, X As Single, Y As Single)
saveSelStart = Text1.SelStart
End Sub

If the control's value doesn't pass your tests in the Change event procedure, you must restore its previous valid value; this action recursively fires a Change event, and you must prepare yourself to neutralize this nested call. You might wonder why you also need to trap the KeyUp, MouseDown, and MouseMove events: The reason is that you always need to keep track of the last valid position for the insertion point because the end user could move it using arrow keys or the mouse.

The preceding code snippet uses the IsNumeric function to trap invalid data. You should be aware that this function isn't robust enough for most real-world applications. For example, the IsNumeric function incorrectly considers these strings as valid numbers:

123,,,123
345-
$1234 ' What if it isn't a currency field?
2.4E10 ' What if I don't want to support scientific notation?

To cope with this issue, I have prepared an alternative function, which you can modify for your particular purposes. (For instance, you can add support for a currency symbol or the comma as the decimal separator.) Note that this function always returns True when it's passed a null string, so you might need to perform additional tests if the user isn't allowed to leave the field blank:

Function CheckNumeric(text As String, DecValue As Boolean) As Boolean
Dim i As Integer
For i = 1 To Len(text)
Select Case Mid$(text, i, 1)
Case "0" To "9"
Case "-", "+"
' Minus/plus signs are only allowed as leading chars.
If i > 1 Then Exit Function
Case "."
' Exit if decimal values not allowed.
If Not DecValue Then Exit Function
' Only one decimal separator is allowed.
If InStr(text, ".") < i Then Exit Function
Case Else
' Reject all other characters.
Exit Function
End Select
Next
CheckNumeric = True
End Function

If your TextBox controls are expected to contain other types of data, you might be tempted to reuse the same validation framework I showed you previously—including all the code in the GotFocus, Change, KeyUp, MouseDown, and MouseMove event procedures—and replace only the call to IsNumeric with a call to your custom validation routine. Things aren't as simple as they appear at first, however. Say that you have a date field: Can you use the IsDate function to validate it from within the Change event? The answer is, of course, no. In fact, as you enter the first digit of your date value, IsDate returns False and the routine therefore prevents you from entering the remaining characters, and so preventing you from entering any value.

This example explains why a key-level validation isn't always the best answer to your validation needs. For this reason, most Visual Basic programmers prefer to rely on field-level validation and test the values only when the user moves the input focus to another field in the form. I explain field-level validation in the next section.

Trapping Keyboard Activity - Visual Basic 6 TextBox Control

TextBox controls support KeyDown, KeyPress, and KeyUp standard events. One thing that you will often do is prevent the user from entering invalid keys. A typical example of where this safeguard is needed is a numeric field, for which you need to filter out all nondigit keys:

Private Sub Text1_KeyPress(KeyAscii As Integer)
Select Case KeyAscii
Case Is < 32 ' Control keys are OK.
Case 48 To 57 ' This is a digit.
Case Else ' Reject any other key.
KeyAscii = 0
End Select
End Sub

You should never reject keys whose ANSI code is less than 32, a group that includes important keys such as Backspace, Escape, Tab, and Enter. Also note that a few control keys will make your TextBox beep if it doesn't know what to do with them—for example, a single-line TextBox control doesn't know what to do with an Enter key.

Don't assume that the KeyPress event will trap all control keys under all conditions. For example, the KeyPress event can process the Enter key only if there's no CommandButton control on the form whose Default property is set to True. If the form has a default push button, the effect of pressing the Enter key is clicking on that button. Similarly, no Escape key goes through this event if there's a Cancel button on the form. Finally, the Tab control key is trapped by a KeyPress event only if there isn't any other control on the form whose TabStop property is True.

You can use the KeyDown event procedure to allow users to increase and decrease the current value using Up and Down arrow keys, as you see here:

Private Sub Text1_KeyDown(KeyCode As Integer, Shift As Integer)
Select Case KeyCode
Case vbKeyUp
Text1.Text = CDbl(Text1.Text) + 1
Case vbKeyDown
Text1.Text = CDbl(Text1.Text) -1
End Select
End Sub

There's a bug in the implementation of TextBox ready-only controls. When the Locked property is set to True, the Ctrl+C key combination doesn't correctly copy the selected text to the Clipboard, and you must manually implement this capability by writing code in the KeyPress event procedure

example for use OptionButton in Application

The application responds to the following events

The change event of the TextBox reads the value and stores it in a form-level numeric variable.

The click event of optOct button returns curretval in octal.

The click event of the optHex button curerntval in hexadecimal

The click event of the optDec button returns the decimal equivalent of the value held currentval.

The following code is entered in the general declarations section of the Form.

Dim currentval as variant

The variable is initialized to 0 by default. The change event procedure checks to ascertain the number system (Octal, Hexadecimal) that is in effect and then reads in the number.

Private Sub Text1_Change()
If optOct.Value = True Then
currentval = Val ("&O" & LTrim (Text1.Text) & "&")
Elseif optDec.value = True Then
currentval = Val (LTrim (Text1.Text) & "&")
Else
currentval = Val ("&H" & LTrim (Text1.Text) & "&")
End if
End Sub

The Val function is used to translate string to a number and can recognize Octal and Hexadecimal strings. The LTrim function trims the leading blanks in the text. The following code is entered in the click events of the OptionButton controls.

Private Sub optOct_Click()
Text1.Text = Oct(currentval)
End Sub

Private Sub optHex_Click()
Text1.Text = Hex(currentval)
End Sub

Private Sub optDec_Click()
Text1.Text = Format(currentval)
End Sub

The follwoing code is entered in the click event of teh Close button.

Private Sub cmdClose_Click()
Unlod Me
End Sub

The Application is run by pressing F5 or clicking on the Run icon in the tool bar. By pressing the Exit button the program is terminated.

Setting properties to a TextBox

Setting properties to a TextBox
Text can be entered into the text box by assigning the necessary string to the text property of the control

If the user needs to display multiple lines of text in a TextBox, set the MultiLine property to True

To customize the scroll bar combination on a TextBox, set the ScrollBars property.

Scroll bars will always appear on the TextBox when it's MultiLine property is set to True and its ScrollBars property is set to anything except None(0)

If you set the MultilIne property to True, you can set the alignment using the Alignment property. The test is left-justified by default. If the MultiLine property is et to False, then setting the Alignment property has no effect.

Run-Time Properties of a TextBox control
The Text property is the one you'll reference most often in code, and conveniently it's the default property for the TextBox control. Three other frequently used properties are these:

The SelStart property sets or returns the position of the blinking caret (the insertion point where the text you type appears). Note that the blinking cursor inside TextBox and other controls is named caret, to distinguish it from the cursor (which is implicitly the mouse cursor). When the caret is at the beginning of the contents of the TextBox control, SelStart returns 0; when it's at the end of the string typed by the user, SelStart returns the value Len(Text). You can modify the SelStart property to programmatically move the caret.

The SelLength property returns the number of characters in the portion of text that has been highlighted by the user, or it returns 0 if there's no highlighted text. You can assign a nonzero value to this property to programmatically select text from code. Interestingly, you can assign to this property a value larger than the current text's length without raising a run-time error.

The SelText property sets or returns the portion of the text that's currently selected, or it returns an empty string if no text is highlighted. Use it to directly retrieve the highlighted text without having to query Text, SelStart, and SelLength properties. What's even more interesting is that you can assign a new value to this property, thus replacing the current selection with your own. If no text is currently selected, your string is simply inserted at the current caret position.

When you want to append text to a TextBox control, you should use the following code (instead of using the concatenation operator) to reduce flickering and improve performance:

Text1.SelStart = Len(Text1.Text)
Text1.SelText = StringToBeAdded

One of the typical operations you could find yourself performing with these properties is selecting the entire contents of a TextBox control. You often do it when the caret enters the field so that the user can quickly override the existing value with a new one, or start editing it by pressing any arrow key:

Private Sub Text1_GotFocus()
Text1.SelStart = 0
' A very high value always does the trick.
Text1.SelLength = 9999
End Sub

Always set the SelStart property first and then the SelLength or SelText properties. When you assign a new value to the SelStart property, the other two are automatically reset to 0 and an empty string respectively, thus overriding your previous settings.

The selected text can be copied to the Clipboard by using SelText:

Clipboard.SelText text, [format]

In the above syntax, text is the text that has to be placed into the Clipboard, and format has three possible values.

1. VbCFLink - conversation information
2. VbCFRTF - Rich Text Format
3. VbCFText - Text

We can get text from the clipboard using the GetText() function this way:

Clipboard.GetText ([format])

Some of the pitfalls of ad hoc management

Everyone does projects. The idea that all it takes to be successful is technical knowledge and lots of intensive hard work leads to unnecessary stress, avoidable rework, unnecessary conflicts and a greater chance of failure.

As fun and exciting as it might be, managing in an ad hoc, seat-of-the-pants, shoot-from-the-hip way is not the most effective way when it comes to managing projects. That is because projects often cannot be planned and carried out entirely from the top of your head. When you experience being overwhelmed, or your outcomes are not as good as they could have been, it may be time for managing in a more structured and thoughtful way.
For example, when you start thinking about moving an office, you probably realize that it can be quite complex. There are many dependencies, such as if you committed to be out of the current space by a certain date, you have to make sure you can go somewhere, ideally to your new space. If the new space is not ready, you have to find another temporary place and/or storage. If you cannot find a mover or schedule phone and other installations, you may need to renegotiate the exit date. If the new space is not entirely ready, you need to carefully plan where and how people will operate. As you can see, there is a lot of complexity in even a simple move. This is a project. Managing it like a project and in the right way will improve your chances for success. Projects require a disciplined yet flexible approach.

Not managing projects the right way leads to unnecessary rework and costs, delays, unsatisfied customers and hostile relationships. Think about the times that you or your customers have been impacted by late delivery of project results or by having to do unnecessary rework or by having yourself and others affected by confusion and chaos that could have been avoided by better project planning and control. Think about the time, effort and money that could have been saved. Think about the relations that were disrupted, in some cases irreparably so. In the unlikely case that you have no personal experience, think about high profile projects like the Challenger space shuttle in which poor project management practices led to loss of life or the “Big Dig” in Boston in which poor project planning, communications or control resulted in huge costs and delivery delays.


Managing projects well increases the probability of success and leads to better results, lower costs, less effort, shorter time, better relationships and the ability to continuously improve performance across multiple projects. At the same time, it is necessary to not over manage. Too much of anything is counter productive. In managing projects, the right balance between discipline and flexibility is best.

Most projects are managed by people who are drafted because they have a combination of being available, have subject matter expertise, and are natural coordinators and/or good communicators. Many of these incidental project managers do a great job despite having had little or no training in project management. That is because much of project management is good common sense and because good project managers and performers combine acts of heroism, the acceptance of delays and other shortfalls, good leadership and management skills and the ability to adapt well in moment to moment project performance.

Imagine how much better they might be with a more solid foundation

source from :http://www.profsr.com/msproject/msproj04.htm
image processing

Projects, Their Outcomes and Project Management

Projects are efforts to achieve objectives, within finite time and cost expectations. Projects are contrasted with operational activities – the repetitive things performed regularly over time. In some way the dividing line between projects and operational activities is not clear; often an operational activity is a series of small projects. However, what is clear is, healthy projects have a finite end that is reached either when the project objectives have been met or when the project is cancelled.

In this paper the term outcome will be used to mean any project result, whether it is a new or changed product, event or process. Projects produce outcomes like newly design car models, an annual budget, a great party, or a new procedure. The use of the outcome and its value after the project delivers it are the underlying justification for the project.

So, what does it mean to manage a project? It is the application of a broad set of skills to properly initiate, plan, execute, control and close a project. The primary skills are scoping (i.e., describing and agreeing on project objectives and requirements), scheduling, and estimating. Added to these core skills are managing risk and uncertainty, managing quality, communicating, managing ourselves, and collaborating with others, including suppliers of goods and services and everyone else who works on or is affected by the project. The people who are involved or interested in a project are referred to as stakeholders.

To put projects and project management into practical context, it is useful to take a systems view. This view recognizes that everything is operating in a system of interacting people, organizations, things and processes. Change or activity anywhere can have an effect elsewhere. The more one can predict the effect, the greater one's control of the system's performance. In complex systems, no one can ever predict the effect of actions with 100% accuracy. A project is a complex system. Project management itself is also a complex system.

Figure 1, below, is a picture of project management as a system. The Unified Project Management Methodology (UPMM™) is one of many views in use today to describe the various activities in managing projects.


A single project is managed from Originating, the time someone communicates an idea that may someday become a project, through Closing, the completion of the project, if in fact the project becomes a project and is completed.

Surrounding the performance of a single project are activities that support and direct the organization and its ability to perform multiple projects in a complex, changing environment. These activities include Ongoing Improvement, the effort to learn from past experience and improve the way you perform and manage projects; Portfolio Management & Governance, the decision making needed to select, initiate and continue the right projects and to manage the optimum use of scarce resources; and Multi-project Management, the process for looking across all of the projects being performed and managing them as a group to avoid conflicts and promote synergy.

Effective portfolio management and multi-project management are among the most critical factors for successful projects. They address many of the root causes of chronic problems in projects, such as the chronic over burdening of resources and constant priority shifts that create confusion and impact productivity.

Collaboration and Consulting represents the critical need for teamwork, communication, coordination and the management of knowledge and information.

Friday, August 21, 2009

Where to get the funs descriptions from

This topics won't tell how to change the button text through API or how to find a file quickly. It is not a API functions documentation.

To get the description of an API function, you need to have either SDK help file or the Microsoft SDK documentation (it's more that 40MB I think - how can I place it here?). Such SDK helps are shipped with Borland Delphi 3.0 package or MS Visual C++ 5.0 for example. Search the Internet and ask your friends to get one. The newer it is the better.

Note that SDK help for Win 3.x won't help you as some functions are obsolete, though most of them still exist for compatibility in Win95.

API : Some Windows Specifics

This topic is intended to give you a clue about some Windows specifics that are not the same under VB.

Windows identifies every form, control, menu, menu item or whatever you can think of by its handle. When your application is run, every control on it is assigned a handle which is used later to separate the button from the rest of the controls. If you want to perform any operation on the button through an API you must use this handle. Where to get it from? Well VB has provided a Hwnd property for all controls that have handles in Windows.

Windows works with pixels, not twips. So, it is a good idea to have the controls you'll use API functions over set their ScaleMode properties to Pixel(3) so that you can use ScaleXXX properties to get their metrics. But even though, you have this opportunity, you may still need to convert twips to pixels and vice versa. You do it using TwipsPerPixelX and TwipsPerPixelY or the global Screen object. Here it is:

pixXValue = twipXValue \ Screen.TwipsPerPixelX
pixYValue = twipYValue \ Screen.TwipsPerPixelY

twipXValue = pixXValue * Screen.TwipsPerPixelX
twipYValue = pixYValue * Screen.TwipsPerPixelY

I haven't really seen the TwipsPerPixelX and TwipsPerPixelY value to be different, but its always better to make difference, at least for the good programing style. Also note that \ (for integer division) is used instead of / as pixels must always be whole numbers.

Another thing to mention is that Windows uses different coordinate systems for the functions. So, be careful.

And lastly, don't forget that VB is safe till the moment you begin to use APIs. A single syntax error in an API call may cause VB to crash (save often!). Also VB cannot debug APIs and if your program is crashing or behaving awkwardly, firstly check the API calls - for missed ByVal, for mistaken type or parameter, everything).

Windows API Message

OK, now you know what API function is, but you have definitely heart of messages (if you haven't you will soon do) and wonder what this is.
Messages are the basic way Windows tells your program that some kind of input has occurred and you must process it. A message to your form is sent when the user clicks on a button, moves the mouse over it or types text in a textbox.
All messages are sent along with four parameters - a window handle, a message identifier and two 32-bit (Long) values. The window handle contains the handle of the window the message is going to. The identifier is actually the type of input occurred (click, mousemove) and the two value specify an additional information for the message (like where is the mouse cursor when the mouse is been moved).
But, when messages are sent to you, why don't you see them, looks like someone is stealing your mail. And before you get angry enough, let me tell you.
The theft is actually VB. But he does not steal your mail, but instead read it for you and give you just the most important in a better look (with some information hidden from time to time). This better look is the events you write code for.
So, when the user moves the mouse over your form, Windows sends WM_MOUSEMOVE to your window, VB get the message and its parameters and executes the code you've entered for Button_MouseMove event. Along the way, VB has transformed the second 32-bit value of the message (it contains the x and y position in pixels, 16-bit each) into two Single type value of twips.
Now, say you need the coordinates of the mouse in pixels. VB converted them into twips, and now you will convert them into pixels again. Apart from losing time, it is somehow irritating to know Windows gives you what you need and VB "favorably" alters it so that you must re-alter it. Here you will ask - Can't I receive the messages myself. OK, there is a way called SubClassing, but you should use it only if really necessary as it goes a bit against the concepts of safe programming of VB.
Something else that needs to be said: You can send massages to your own window or to another one yourself. You just call SendMessage or PostMessage (SendMessage will cause the window to process the message immediately and Post message will post it onto a queue, called message queue, after any other messages waiting to be processed (it will return after the message is processed, i.e. with some delay)). You must specify the window handle to send the message to, the message identifier (all message identifiers are available as constants in VB API Text Viewer) and the two 32-bit values.

API Declaration

As said in What's API, functions are declared in Dlls located in the Windows System directory. You can type in the declaration of an API just as you do with any other function exported from a Dll, but VB has provided an easier way to do it. It is called API Text Viewer.
To have some API declared in your project, just launch API Text Viewer, open Win32Api.txt (or .MDB if you have converted it into a database to speed it up), choose Declares, find the function, click Add and then Copy. Go to your project and paste it in. Do the same to have a predefined constant or type.
There are few problems you may face:
Suppose you want to declare a function in your form module. You paste the declaration and run the program. VB says Compile Error, ...and Declare statements not allowed as Public members of ... . Sounds bad, but it isn't, all you need to do is add Private in front of the declaration (like Private Declare Function ...). Do not forget, though, that the function will be visible only within this form module.
In some cases, you may get the message Ambiguous name detected by VB. It means you have two functions, constants or whatsoever sharing one name. As most of the functions (maybe all of them, I haven't checked that) are aliased, which means they are given different names, and not their original using Alias clause, you may simply change the name of the function and it will still work.
You may read the Declare statement help topic of VB's for description of Alias.

C# Primary Sites

C# Primary Sites
The Code Project Whitepapers and code examples by category. Good code resource.Visual C# KicksDeveloperFusion (C# Directory: U.K. Developer Community) C# CornerC# developers network: code, downloads, discussions,... C# HelpHelp for C# Developers Creating Designable Components for Microsoft Visual Studio .NET DesignersAn introduction to using components in C# development. (July 2000 by Shawn Burke, Microsoft Corp.) C# Station DevX Resources C# Friends See whitepapers, a class- "browser" reference, and more... by Salman Ahmed. Lutz Roeder's Programming .NETTools and source code examples. Reflector assembly browser, Resourcer, Digger. Also applications and source code. Code Hound C# Search Engine C# Notebook Notebooks, Bookstore, Code, .dll tutorial,..much more CSharpHelp.Com The place for C# developers. Peter Drayton's .NET GoodiesC# Utilities & samples with code.

Thursday, August 20, 2009

Graphically Show CPU Memory Usage no of process

This is simple program that shows how to use performance calculator to get % CPU usage, memory usage in kb and number of processes running on the computer. You can modify the code for your convenience. Do reply me.

Downloads Hear

Monday, August 17, 2009

Visual Basic application and create a full fledged screen saver

Visual Basic is a great developers language it allows you to create applications that are very functional and to do so in a quick way. This is why people love VB6. However, at times it can be hard to figure out how to interact directly with the Windows Operating System. To do this we need to make API calls. Anyone who has delved into using VB and API's knows that it can be a little cumbersome at times. However, this tutorial demonstrates how you can make the API calls from your Visual Basic application and create a full fledged screen saver!

A screen saver at its core is very simple. It is simply a window that covers the entire screen. In Visual Basic 6 this is accomplished by createing a form that will be displayed full size overtop of everything else. Lets start with the simple. Create a new VB6 project with just the main form. Set the properties to the following:

Property Setting
Caption ""
ControlBox False
MinButton False
MaxButton False
BorderStyle 0 - None
WindowState 2 - Maximized
BackColor &H0


Private Declare Function SetWindowPos Lib "user32" _
(ByVal hwnd As Long, ByVal hWndInsertAfter As Long, _
ByVal x As Long, ByVal Y As Long, ByVal cx As Long, _
ByVal cy As Long, ByVal wFlags As Long) As Long

Private Declare Function ShowCursor Lib "user32" _
(ByVal bShow As Long) As Long
We are going to use these functions a little later. First lets create a helper subroutine that will always keep our form on top.

Sub AlwaysOnTop (FrmID As Form, OnTop As Boolean)
Const SWP_NOMOVE = 2
Const SWP_NOSIZE = 1
Const FLAGS = SWP_NOMOVE Or SWP_NOSIZE
Const HWND_TOPMOST = -1
Const HWND_NOTOPMOST = -2

If OnTop Then
OnTop = SetWindowPos(FrmID.hWnd, HWND_TOPMOST, 0, 0, 0, 0, FLAGS)
Else
OnTop = SetWindowPos(FrmID.hWnd, HWND_TOPMOST, 0, 0, 0, 0, FLAGS)
End If
End Sub
The next part is the load-up of our Screen Saver: put these lines in the Load event of the form. This will handle things when the Windows OS launches our screen saver.

Select Case LCase(Left(Command, 2))
Case "/p": End
Case "/s"
Case Else: Me.Hide: frmSettings.Show: Exit Sub
End Select

Dim x As Integer
Call AlwaysOnTop(Me, True)
x = ShowCursor(False)
The form will always stay on top and the cursor will desappear.
When the Screen Saver unloads, we must do the inverse. Put these lines in the Unload event of the form.

Dim x As Integer
x = ShowCursor(True)
The first 5 lines of the Form_Load event are needed to make the Screen Saver work, work as an example or show its settings. Windows tells the Screen Saver what to do through command line parameters: /S tells the Screen Saver to start working, /P tells the Screen Saver to start working in a preview area, and no parameters makes the Screen Saver show its settings dialog. So, you may create a form called frmSettings that gives the opportunity to set Screen Saver parameters and to save them in a INI file or in the Registry; that dialog must unload the program when it is finished.

Another important thing to do, is to handle the events that unload the Screen Saver. A Screen Saver is usually unloaded when we move the mouse or hit a key, so we'll put the instruction Unload Me in the KeyPress event of the form. For the MouseMove or MouseClick events, use these lines:

Static Count As Integer
Count = Count + 1
If Count > 5 Then
Unload Me
End If
This makes sure that the mouse is moved atleast a little bit before it exits. Otherwise your screen saver will exit too easily (with just a bump of the desk or something).

Well, it is your turn now! Can you creat an original and good Screen Saver. You can use controls (even OCXs) to create the graphic, and add code anywhere you want. If you want, you can download this example, located in the samples section of the site, demostrating a full working Screen Saver.

Installing The Screen Saver
When you have finished creating the look of the Screen Saver, it's the moment to compile it and bring it to life. Once you have compiled your Screen Saver, change its EXE extension to SCR. Then, copy it to the Windows\System folder.

To use the Screen Saver, go in the Control Panel, double-click the icon Screen, select the second tab (Screen Saver) and select your program from the Screen Saver dropdown list. Then, click OK.


With these properties, the form will be black, will have no border, buttons or title bar and will cover all the screen.
So, create a form and give it the above properties.

Now we must do two other things. First, each screen saver is a form that stays on the top of all others. Second, we notice that, during the display of a Screen Saver, the mouse cursor desappear.

To make our program do these two things, we first put these two lines in the declarations section of the form:

from http://www.vb6.us/tutorials/createing-visual-basic-screen-saver

Tuesday, August 4, 2009

Working with arrays ListBox

An array can also be assigned to a variable in code. Look at the following example and understand that that is not an implicit declaration. The variable "Week" is declared as Variant. It is assigned an array value in code.


Now, when we get to the next set of controls, different kinds of Lists, these notions may prove useful.


ListBox
With the ListBox control the user can select items from a list of choices. Although the list of choices can be entered in the List property of the control, as in the example below, this is not a very good habit to get into. It is essentially "hardcoding" data into the program and it can cause maintenance headaches.


Working with arrays

Before we get to today's lesson on common controls, we will cover a bit of programming theory on Arrays.
In VB, arrays work in much the same way as they do in all other languages you have studied. By definition an array is an indexed variable, meaning it is one variable with many parts, each part being referenced by an index number. The index number being numeric, it can be manipulated by loop statements, incremented, decremented, etc. An array can contain any valid data type and, if it is of the Variant type, can even contain elements of different types.
An array is declared like any other variable, with the addition of an index:


Dim Department(6) As String

will declare an array of 7 elements of the String type (we assume that it will be 7 Department names). The only problem with this declaration is that the index goes from 0 to 6. So, if you want the name of the sixth Department you have to specify Department(5), which can be confusing at times.
To work around this problem you can specify the starting index in the declaration:


Dim Months(1 To 12) As String

Thus, Months(1) is January and Months(12) is December.
You don't even have to start at 1. If your Sections are numbered 101 - 120 you can define an array:


Dim Sections(101 To 120) As Integer

One common method of manipulating arrays is to use For...Next loops:


Thursday, July 30, 2009

Finally! The Gold Medal, 1st Place

Finally! The Gold Medal, 1st Place, the highest award I can bestow goes to ...

TA DAH!

VB.NET is finally completely Object Oriented!

Now when you go to the beach, the C++ programmers won't kick sand in your face and steal your (girlfriend/boyfriend - pick one). And you can still code a complete General Ledger Trial Balance while they're trying to figure out which header files to include.

For the first time, you can code as close to the chip as you need to and access all the system internals your heart desires without having to resort to those nasty Win32 API calls. You've got inheritance, function overloading, asynchronous multithreading, garbage collection, and everything is an object. Can life get any better?

Did I hear someone say C++ has multiple inheritance and .NET still doesn't?

Burn the heretic!


from http://visualbasic.about.com/

The Bronze Award - 3rd Place

The Bronze Award - 3rd Place, goes to Arrays are 0 based instead of 1 based!

It's just one syntax change, but this change gets "medal podium" status because it is voted, "most likely to screw up your program logic". Remember, 3rd place IS "Award(2)" in our list. If you have counters and arrays in your VB6 program (and how many don't), this one will MESS YOU UP.

For ten years, People have been asking, "What was Microsoft smoking when they did it this way?" And for ten years, programmers have sort of universally ignored the fact that there was a myArray(0) element that just took up space and didn't get used for anything ... Except for those programmers who DID use it and their programs looked, I mean, just "weird".

For I = 1 to 5
MyArray(I - 1) = Whatever
Next

I mean, REALLY! ...

Probably no other single feature of Visual Basic "notNet"

The Silver Medal of 2nd Place goes to honor an old friend that was dropped into the bit bucket of programming with the passing of VB6! I speak of none other than, The Variant Datatype.

Probably no other single feature of Visual Basic "notNet" better represents the philosophy of "fast, cheap, and loose". This image dogged VB right up to the introduction of VB.NET. I'm old enough to remember the introduction of Visual Basic 3.0 by Microsoft: "Oh Wow! Lookee here! With the new, improved Variant data type, you don't have to declare variables or nothin'. You can just think 'em up and code 'em."

Microsoft changed their tune pretty fast on that one and recommended declaring variables with a specific datatype almost immediately, leaving many of us to wonder, "If you can't use Variants, why have them?"

But while we're on the subject of datatypes, I should mention that a lot of datatypes have changed in addition to dropping Variant into wet cement. There's a new Char datatype and a Long datatype that is 64 bits. Decimal is way different. Short and Integer aren't the same length anymore.

And there is a new "Object" datatype that can be anything. Did I hear someone say, "Son of Variant"?

In 4th Place, we have Changes to Procedure

In 4th Place, we have Changes to Procedure Calls!

This is the "goodness, purity, and wholesome virtue" award and represents a lot of hard campaigning by the "no more sloppy code" faction.

In VB6, if a procedure parameter variable is an intrinsic type, then it's ByRef, unless you have coded it ByVal explicitly, but if it's not coded ByRef or ByVal and it's not an intrinsic variable then it's ByVal. ... Got that?

In VB.NET, it's ByVal unless it's coded ByRef.

The ByVal VB.NET default, by the way, also prevents changes to parameter variables in procedures from being unintentionally propagated back into the calling code - a key part of good OOP programming.

Microsoft also "overloads" VB.NET with a change in the requirements for parentheses in procedure calls.

In VB6, parentheses are required around arguments when making function calls, but not when calling a subroutine when not using the Call statement but they are required when the Call statement is used.

In VB.NET, parentheses are always required around a nonempty argument list.

Award(5)", our 6th Place award goes to the C groupies

"Award(5)", our 6th Place award goes to the C groupies choice: C-like Syntax Changes!

Now you can code a += 1 instead of a = a + 1, saving THREE WHOLE KEYSTROKES!

Programmers of the World, Rejoice! VB has been raised up to C level, and a whole new generation trying to learn VB will get a little closer to the mass confusion that confronts students of C++.

But wait! There's more!

VB.NET now features "short circuit logic" that has introduced subtle bugs into C++ code for years to save precious nano-seconds of processor time. Short circuit logic only evaluates multiple conditions in a logical statement if necessary. For example:

Dim R As Boolean
R = Function1() And Function2()

In VB6, both functions are evaluated whether they need it or not. With VB.NET, if Function1() is false, Function2() is ignored since "R" can't be True. But, what if a global variable is changed in Function2() - just by chance (C++ programmers would say, "by poor programming".) Why does my code produce the wrong answer some of the time when it's translated to VB.NET? This might be it!

For Trying harder, VB.NET will Catch a little luck and Finally get recognized for "exceptional" error handling.

VB6 had the last holdout GoTo: "On Error GoTo". Even I have to admit that the C++ style "Try-Catch-Finally" structured exception handling is a vast improvement, not just a half vast improvement.

What, you say "On Error GoTo" is still in VB.NET? Wellll ... We try not to talk about that too much.

VB.NET no longer supports VarPtr, ObjPtr and StrPtr

5th Place selection is a group award: The Miscellaneous Command Changes! They have to share this award and there's a gazillion of 'em. Microsoft has been saving up for ten years and they really cut loose.
VB.NET no longer supports VarPtr, ObjPtr and StrPtr functions which retrieved the memory address of variables. And it doesn't support VB6 LSet which was used to convert one user defined type to another. (Not to be confused with VB6 LSet which does something completely different - see below.)
We also bid fond adieu to Let, Is Missing, DefBool, DefByte, DefLng, DefCur, DefSng, DefDbl, DefDec, DefDate, DefStr, DefObj, DefVar, and (my personal favorite!) GoSub.
Circle has morphed into GDI+ DrawEllipse. The same goes for Line to DrawLine. In calculation we now have Atan instead of Atn, Sign goes in for Sgn, and Sqrt suits up for the big game instead of Sqr.
In string processing, even though they're still available if you reference a Microsoft compatibility namespace, we have PadRight for VB6's LSet (again, totally different than VB6's LSet, of course) and PadLeft for RSet. (There goes the three keystrokes we saved with "+="!)
And of course, since we're OOP now, don't fret if Property Set, Property Let, and Property Get are not met in VB.NET, you bet!
Finally, Debug.Print becomes either Debug.Write or Debug.WriteLine. Only nerds print everything anyway.
This doesn't even touch all the NEW commands in VB.NET, but we've got to stop this nonsense somewhere.

.NET needed to do, Microsoft decided

In the meantime, Java, Python, and a whole lot of other programming languages that WERE object oriented started to appear. Visual Basic was getting passed up - big time! This is a situation Microsoft does not tolerate ... and they resolved to solve the problem once and for all. The solution is .NET.
But to do the things that .NET needed to do, Microsoft decided that they had to "break compatibility". That is, Visual Basic programs had been (with very minor exceptions) "upward compatible" from VB1 right up to VB6. A program written in that first version of VB would still compile and run in the next version. But with VB.NET, Microsoft found they just couldn't make the language completely OOP and maintain upward compatibily.
Once they made this fundamental decision, the flood gates opened on ten years of accumulated "wish list" changes and ALL of them went into the new VB.NET. As they say in Britain, "In for a penny, in for a pound."
Without further delay, here's my very personal list of the top five changes from VB6 to VB.NET in reverse order.
Wellllll .... just one further delay. Since we're changing from VB6, where an array declared as Dim myArray(5) has 6 elements, We have six of 'em. It's only fitting

The Top Five Changes between VB 6 and VB.NET

Visual Basic 1.0 was a major earthquake throughout programming. Before VB1, you had to use C, C++, or some other horrible development environment to create Windows applications. Programmers literally spent weeks just drawing windows on screens with picky, detailed, hard to debug code. (The same thing you can do by dragging a form from the toolbar in a few seconds.) VB1 was a hit and gazillions of programmers immediately started using it.
But to make the magic happen, Microsoft made some major architecture compromises. In particular, since VB1 created the forms and controls, they didn't allow the programmer access to the code that did it. You either let VB create everything, or you used C++.
VB 2 through 6 maintained this same architecture. Microsoft made some very clever updates which gave programmers a lot more control, but in the final analysis programmers still couldn't integrate their code with the VB code. It was a black box - and not in the good OOP way either. Another way of saying this was that the programmer didn't have access to the internal VB "objects" and another way of saying that was that VB6 still wasn't fully "object oriented".

The reason for the error this time is that when the VB 6

The reason for the error this time is that when the VB 6 code was pasted into VB.NET, Intellisense corrected another "error" and added the VB.NET default, ByVal. This doesn't allow the actual value of the argument to be changed, only the copy made for the subroutine. If this is changed to ByRef in the VB.NET program, all is well again. This is one thing the Upgrade Wizard does right, by the way. It's changed to ByRef automatically when the Wizard is run.

The explanation can be found in this note found buried pretty

The explanation can be found in this note found buried pretty deeply in the VB 6 documentation:
You are not required to use the Call keyword when calling a procedure. However, if you use the Call keyword to call a procedure that requires arguments, argumentlist must be enclosed in parentheses. If you omit the Call keyword, you also must omit the parentheses around argumentlist. If you use either Call syntax to call any intrinsic or user-defined function, the function's return value is discarded. Emphasis added.
The actual behavior of the code doesn't seem to quite follow the documentation. But one thing is clear, the result is discarded. Not knowing this interesting bit of non-obvious behavior could result in a hard to find bug in VB 6.
Because VB 6 didn't follow the conventions used by other languages and was generally confusing and inconsistent, Microsoft decided to scrap most of the procedure call syntax in VB 6 when they moved to VB.NET. In VB.NET, there is one way to do things and if you don't do it that way, an error results. Let's see what has to be done to convert this code to VB.NET.
One way to convert the VB 6 project is to use the Upgrade Wizard. Just open the VB 6 project in VB.NET and the wizard takes over. But the Upgrade Wizard often misses a lot of optimization and can't convert some things at all. So a lot of programmers just copy and paste the code from VB 6 to VB.NET and correct the errors that result. If you do this with the first code example at the top of the article, there's just one error to correct: the fact that the variable CallingArg isn't declared. When this is declared as String, the program runs! But it doesn't quite get the right result as shown below:

ByVal and ByRef: Passing Arguments in Visual Basic

There are two ways to pass arguments to a procedure in Visual Basic: ByVal and ByRef. This refers to whether a copy of the argument is passed to the procedure (ByVal - the value is passed) or whether the actual argument itself is passed (ByRef - a reference to the argument is passed). The default for VB 6 is to call ByRef.

There are also two types of procedures in Visual Basic: Function and Sub. The difference is that a Function returns the a value assigned to the function name and a Sub doesn't. So if you want to return a value to the calling routine, there are two ways to do it. In VB 6, the code that returns a value could look like this for a Sub:

Sub code to return a value from a procedure call

Public Sub CallingSub() CallingArg = "ABCDEF" CalledSub CallingArg MsgBox (CallingArg)End SubPublic Sub CalledSub(CalledArg) CalledArg = "987654"End Sub
Or the code could look like this for a Function:
Function code to return a value from a procedure call
Public Sub CallingSub() CallingArg = "ABCDEF" CalledFunc CallingArg MsgBox (CallingArg)End SubPublic Function CalledFunc(CalledArg) CalledArg = "987654" CalledFunc = "Any Return Value"End Function
The result of both is a messagebox that displays the value "987654" that is returned as a result of changing the value of the argument.
Note that the main difference is that the function has just one more statement to assign a return value to the function name. In VB 6, the difference was sometimes considered meaningless and programmers often used subroutines rather than functions out of habit or just to save a statement.
A few other "shortcuts" in VB 6 should be pointed out.
No variables are declared.This means that all of the variables are of type "Variant" - similar to "Object" in VB.NET.
No scoping or typing is done in the argument list.This means that everything uses the default settings.
The procedure call doesn't use any parentheses or a Call keyword.
This has some additional consequences. Let's look at those next. The illustration below shows an interesting result of simply changing whether parentheses are used or not in VB 6.

Sunday, July 26, 2009

Object Exchange

Object Exchange (OBEX) protocol - Windows CE .Net's support for OBEX works over Bluetooth and infra red data association (IrDA) protocols . Object Exchange (OBEX) is an efficient, compact binary protocol that enables a wide range of devices to exchange data spontaneously in a simple, efficient manner.

Media Sense - This feature improves the roaming experience for mobile devices users by notifying application of network status.

Real time collaboration and communication (RTC/SIP) - Real time communication (RTC) enables messaging, presence, and audio (voice over IP between any two IP-enabled devices .

Realiable core operating system services for demanding embedded designs : Windows CE .ET offers reliable core operating system services that enable the most demanding real time embedded designs across a breadth of devices .

New and enhanced operating system features include:

Small footprint: Continuing the effort to minimize the operating system footprint for embedded devices, Windows CE .NET provides granular Kernel componentization. Windows CE .NET supports a minimum configuration platform as small as 200 KB with minimum Kernel functions only.

Enterprise-scale - Network security enhancements include support for the Kerberos Security Protocol.

Wide selection of CPU'S- Windows CE .NET provides a high level of processor flexibility with support for the following four families of microprocessors and emulation technologies like ARM, MIPS, SHx, x 86 etc.

Real time - Real time processing support for the most demanding support for the most demanding deterministic applications with 256 priority levels and nested interrupt support.

Net- enabled for creating rich personalized experiences - Windows CE .NET enables you to build smart Microsoft .NET-enabled devices and create rich, personalized experiences.

XML - XML allows developers to easily describe and deliver rich, structured data from any application in a standard consistent way.

Net compact Framework :

Net compact Framework : The .NET Compact Framework supports all processors supported by windows CE .NET . For more information on how to develop application using the .NET Framework, please see .NET on the MSDN site. Look in the .NET Compact Framework Read me' for specific information about implementation issues in your embedded design.

Microsoft Direct3D API - Provides support for interactive three-dimensional (3-D) graphics applications by allowing device dependent access to 30d video-display hardware in devices-independent manner.

Windows Media 8 compressor/decompressor (codecs) and controls - Supports the latest Microsoft Windows Media 8 codes and controls ,which allows for the latest high-bandwidth encoded multimedia streams .

Easy-to-use end-to-end tool set: Windows CE .NET provides an integrated end-to-end tool set to help developers reduce both operating system and application development time, allowing them to get devices to market faster.

These tools include:

Emulation technology - Windows CE .NET include emulation technology to enable developers to build and test their designs on their Windows 2000 or Windows xp professional workstations without additional hardware investments.

New platform wizard - The new platform wizard provides a foundation for starting device designs for:

Cellophanes / Smart phones
Custom devices
Digital imaging devices
Industrial automation devices
Internet/media appliances
Personal digital assistants (PDA)/Mobile handhelds
Residential gateways
Retail point-of-sale
Set-top boxes
Tiny kernels
Web pads Windows thin clients
Support for managed and native code - To write applications for Windows CE .NET, Microsoft offers a rich set of languages for creating managed .NET-enabled or unmanaged (native) applications.

Windows CE .NET:

Windows CE .NET:

Window CE .NET is the successor to Windows CE 3.0 Designed from the ground up for the embedded marketplace, Window CE .NET aims to deliver a robust realtime operating system for rapidly building the next generation of smart mobile and small footprint devices.

With a complete operating system feature set and end-to-end development environment Windows CE-based devices that requires rich networking hard real time, and a small footprint , as well as rich multimedia and Web browsing capabilities.

Windows CE .NET offers :

Scalable wireless technologies : Windows CE.NET include scalable wireless technologies that enable mobile devices to flexibly connect into existing infrastructures . Supported wireless technologies include Bluetooth.

Windows CE .NET allows a devices to use a Bluetooth-enabled cellular phone as a data modem , and to use a Bluetooth-enabled local area network (LAN) access point to provide network connectivity .

802.1x/Zero Configuration - New features in window CE .NET i.e., 802.11 zero configuration, aim to simplify setup of 802.11 network and to enable seamless roaming from one 802.11 network to another. 801.1x and EAP enhance the security of 802.11 by enabling user/password, certificate, or original equipment manufacturer (OEM) specific authentication to log on to the network.

With Command Explained

Introduction
As mentioned above this tutorial focuses on the With command in Visual Basic 6.0, you can use it to control object on your forms and to set the properties like you can with the click of a mouse. I can hear you ask "Why use this when you can set properties with mouse clicks?". Well the answer is, in the programming world most people use this method and you can then easily change the property without going through any wizards or anything.

Requirements
For this tutorial you will need a Windows based operating system with a copy of Visual Basic 6.0 installed. Nothing else...

The With Command
I feel this command is sometimes underrated and most definantly underused in programs I have seen. People tend not to use this command as the Properties Window in Visual Basic allows you to do it much quicker without typing lines of code. In fact all you are doing is writing the code without typing (if that makes sense).

The syntax for this is really simple...

With objectname
'perform code
End With
Simply enough you replace the object name section with the name of your object e.g. dlgSplash. From here you can use the . (dot) to bring up the syntax suggest list of attributes to set. In our example we will load a splash dialog and then load the main program form.

So say we startup with a sub-routine called main. Using our with command we will show the dlgSplash form and refresh it.

Sub main()
'start with
With dlgSplash
'show form
.Show

'refresh form
.Refresh

End With
End Sub
Simple enough eh? All this does is shorten the dlgSplash.Show to what you see above in the example. Our final code example will have the code above and then load the new form for the main program and remove the splash dialog.
Sub main() 'start with With dlgSplash 'show form .Show 'refresh form .Refresh
'show program form frmMain.Show
'unload splash Unload dlgSplash
End WithEnd Sub
As you may have guessed by now we can shorten the frmMain.Show to this...
With frmMain .ShowEnd With
However if you have a property call in this in an if function for example you have to referenceit properly even though the With may already be where your object is.

Thursday, July 9, 2009

VB ScrollBar - Using ScrollBar Control In Visual Basic 6

The ScrollBar is a commonly used control, which enables the user to select a value by positioning it at the desired location. It represents a set of values. The Min and Max property represents the minimum and maximum value. The value property of the ScrollBar represents its current value, that may be any integer between minimum and maximum values assigned.

The HScrollBar and the VScrollBar controls are perfectly identical, apart from their different orientation. After you place an instance of such a control on a form, you have to worry about only a few properties: Min and Max represent the valid range of values, SmallChange is the variation in value you get when clicking on the scroll bar's arrows, and LargeChange is the variation you get when you click on either side of the scroll bar indicator. The default initial value for those two properties is 1, but you'll probably have to change LargeChange to a higher value. For example, if you have a scroll bar that lets you browse a portion of text, SmallChange should be 1 (you scroll one line at a time) and LargeChange should be set to match the number of visible text lines in the window.

The most important run-time property is Value, which always returns the relative position of the indicator on the scroll bar. By default, the Min value corresponds to the leftmost or upper end of the control:

' Move the indicator near the top (or left) arrow.
VScroll1.Value = VScroll1.Min
' Move the indicator near the bottom (or right) arrow.
VScroll1.Value = VScroll1.Max

While this setting is almost always OK for horizontal scroll bars, you might sometimes need to reverse the behavior of vertical scroll bars so that the zero is near the bottom of your form. This arrangement is often desirable if you want to use a vertical scroll bar as a sort of slider. You obtain this behavior by simply inverting the values in the Min and Max properties. (In other words, it's perfectly legal for Min to be greater than Max.)

There are two key events for scrollbar controls: the Change event fires when you click on the scroll bar arrows or when you drag the indicator; the Scroll event fires while you drag the indicator. The reason for these two distinct possibilities is mostly historical. First versions of Visual Basic supported only the Change event, and when developers realized that it wasn't possible to have continuous feedback when users dragged the indicator, Microsoft engineers added a new event instead of extending the Change event. In this way, old applications could be recompiled without unexpected changes in their behavior. At any rate, this means that you must often trap two distinct events:

' Show the current scroll bar's value.
Private VScroll1_Change()
Label1.Caption = VScroll1.Value
End Sub
Private VScroll1_Scroll()
Label1.Caption = VScroll1.Value
End Sub

The example shown in the following figure uses three VScrollBar controls as sliders to control the individual RGB (red, green, blue) components of a color. The three scroll bars have their Min property set to 255 and their Max property set to 0, while their SmallChange is 1 and LargeChange is 16. This example is also a moderately useful program in itself because you can select a color and then copy its numeric value to the clipboard and paste it in your application's code as a decimal value, a hexadecimal value, or an RGB function.


Use scrollbar controls to visually create colors.

Scrollbar controls can receive the input focus, and in fact they support both the TabIndex and TabStop properties. If you don't want the user to accidentally move the input focus on a scrollbar control when he or she presses the Tab key, you must explicitly set its TabStop property to False. When a scrollbar control has the focus, you can move the indicator using the Left, Right, Up, Down, PgUp, PgDn, Home, and End keys. For example, you can take advantage of this behavior to create a read-only TextBox control with a numeric value that can be edited only through a tiny companion scroll bar. This scroll bar appears to the user as a sort of spin button, as you can see in the figure below. To make the trick work, you need to write just a few lines of code:

Private Sub Text1_GotFocus()
' Pass the focus to the scroll bar.
VScroll1.SetFocus
End Sub
Private Sub VScroll1_Change()
' Scroll bar controls the text box value.
Text1.Text = VScroll1.Value
End Sub


Scrollbar controls are even more useful for building scrolling forms, like the one displayed in Figure 3-15. To be certain, scrolling forms aren't the most ergonomic type of user interface you can offer to your customers: If you have that many fields in a form, you should consider using a Tab control, child forms, or some other custom interface. Sometimes, however, you badly need scrollable forms, and in this situation you are on your own because Visual Basic forms don't support scrolling.

Fortunately, it doesn't take long to convert a regular form into a scrollable one. You need a couple of scrollbar controls, plus a PictureBox control that you use as the container for all the controls on the form, and a filler control—a CommandButton, for example—that you place in the bottom-right corner of the form when it displays the two scroll bars. The secret to creating scrollable forms is that you don't move all the child controls one by one. Instead, you place all the controls in the PictureBox control (named picCanvas in the following code), and you move it when the user acts on the scroll bar:

Sub MoveCanvas()
picCanvas.Move -HScroll1.Value, -VScroll1.Value
End Sub

In other words, to uncover the portion of the form near the right border, you assign a negative value to the PictureBox's Left property, and to display the portion near the form's bottom border you set its Top property to a negative value. It's really that simple. You do this by calling the MoveCanvas procedure from within the scroll bars' Change and Scroll events. Of course, it's critical that you write code in the Form_Resize event, which makes a scroll bar appear and disappear as the form is resized, and that you assign consistent values to Max properties of the scrollbar controls:

' size of scrollbars in twips
Const SB_WIDTH = 300 ' width of vertical scrollbars
Const SB_HEIGHT = 300 ' height of horizontal scrollbars

Private Sub Form_Resize()
' Resize the scroll bars along the form.
HScroll1.Move 0, ScaleHeight - SB_HEIGHT, ScaleWidth - SB_WIDTH
VScroll1.Move ScaleWidth - SB_WIDTH, 0, SB_WIDTH, _
ScaleHeight - SB_HEIGHT
cmdFiller.Move ScaleWidth - SB_WIDTH, ScaleHeight - SB_HEIGHT, _
SB_WIDTH, SB_HEIGHT

' Put these controls on top.
HScroll1.ZOrder
VScroll1.ZOrder
cmdFiller.ZOrder
picCanvas.BorderStyle = 0

' A click on the arrow moves one pixel.
HScroll1.SmallChange = ScaleX(1, vbPixels, vbTwips)
VScroll1.SmallChange = ScaleY(1, vbPixels, vbTwips)
' A click on the scroll bar moves 16 pixels.
HScroll1.LargeChange = HScroll1.SmallChange * 16
VScroll1.LargeChange = VScroll1.SmallChange * 16

' If the form is larger than the picCanvas picture box,
' we don't need to show the corresponding scroll bar.
If ScaleWidth < picCanvas.Width + SB_WIDTH Then
HScroll1.Visible = True
HScroll1.Max = picCanvas.Width + SB_WIDTH - ScaleWidth
Else
HScroll1.Value = 0
HScroll1.Visible = False
End If
If ScaleHeight < picCanvas.Height + SB_HEIGHT Then
VScroll1.Visible = True
VScroll1.Max = picCanvas.Height + SB_HEIGHT - ScaleHeight
Else
VScroll1.Value = 0
VScroll1.Visible = False
End If
' Make the filler control visible only if necessary.
cmdFiller.Visible = (HScroll1.Visible Or VScroll1.Visible)
MoveCanvas
End Sub

Working with scrollable forms at design time isn't comfortable. I suggest that you work with a maximized form and with the PictureBox control sized as large as possible. When you're finished with the form interface, resize the PictureBox control to the smallest area that contains all the controls, and then reset the form's WindowState property to 0-Normal.

Wednesday, May 27, 2009

The Circle Method,uses a common dialog box

The Circle Method

The circle method takes the following format

Circle (x1, y1), radius, color

That draws a circle centered at (x1, y1), with a certain radius and a certain border color. For example, the procedure

Circle (400, 400), 500, VbRed

draws a circle centered at (400, 400) with a radius of 500 twips and a red border.

---------
example
uses a common dialog box here to perform some of the jobs which could be difficult to perform . In this program, a user have to fill in all the coordinates and choose a color before he can proceed to draw the required shape. If one forget to fill in the coordinates or choose a color, he will be asked to do so.

Private Sub Command2_Click()
x1 = Text1.Text
y1 = Text2.Text
x2 = Text3.Text
y2 = Text4.Text
Picture1.Line (x1, y1)-(x2, y2), color, B
End Sub

Private Sub Command3_Click()
CommonDialog1.Flags = &H1&
CommonDialog1.ShowColor
color = CommonDialog1.color

End Sub

Private Sub Command4_Click()
On Error GoTo addvalues
x3 = Text5.Text
y3 = Text6.Text
r = Text7.Text
Picture1.Circle (x3, y3), r, color
Exit Sub

addvalues:
MsgBox ("Please fill in the coordinates ,the radius and the color")

End Sub

Private Sub Command5_Click()
Picture1.Cls
End Sub

Private Sub Command6_Click()
x1 = Text1.Text
y1 = Text2.Text
x2 = Text3.Text
y2 = Text4.Text
Picture1.Line (x1, y1)-(x2, y2), color, BF
End Sub

PSet, Line and Circle Drawing Methods

PSet, Line and Circle Drawing Methods

Other than using the line and shape controls to draw graphics on the form, you can also use the Pset, Line and Circle methods to draw graphics on the form.

(a) The Pset Method

The Pset method draw a dot on the screen, it takes the format

Pset (x , y ), color

(x,y) is the coordinates of the point and color is its color. To specify the color, you can use the color codes or the standard VB color constant such as VbRed, VbBlue, VbGeen and etc. For example, Pset(100,200), VbRed will display a red dot at the (100,200) coordinates.

The Pset method can also be used to draw a straight line on the form. The procedure is

For x= a to b

Pset(x,x)

Next x

This procedure will draw a line starting from the point (a,a) and to the point (b,b). For example, the following procedure will draw a magenta line from the point (0,0) to the point (1000,1000).

For x= 0 to 100

Pset(x,x) , vbMagenta

Next x

In this example, each time you click on the ‘change pictures’ button as shown

In this example, each time you click on the ‘change pictures’ button as shown in Figure 19.2, you will be able to see three images loaded into the image boxes. This program uses the Rnd function to generate random integers and then uses the LoadPicture method to load different pictures into the image boxes using the If…Then…Statements based on the random numbers generated. The output is shown in Figure below


Dim a, b, c As Integer

Private Sub Command1_Click ()

Randomize Timer

a = 3 + Int(Rnd * 3)

b = 3 + Int(Rnd * 3)

c = 3 + Int(Rnd * 3)


If a = 3 Then

Image1(0).Picture = LoadPicture("C:\My Folder\VB program\Images\grape.gif")

End If

If a = 4 Then

Image1(0).Picture = LoadPicture("C:\My Folder\VB program\Images\cherry.gif")

End If

If a = 5 Then

Image1(0).Picture = LoadPicture("C:\My Folder\VB program\Images\orange.gif")

End If

If b = 3 Then

Image1(1).Picture = LoadPicture("C:\My Folder\VB program\Images\grape.gif")

End If

If b = 4 Then

Image1(1).Picture = LoadPicture("C:\My Folder\VB program\Images\cherry.gif")

End If

If b = 5 Then

Image1(1).Picture = LoadPicture("C:\My Folder\VB program\Images\orange.gif")

End If

If c = 3 Then

Image1(2).Picture = LoadPicture("C:\My Folder\VB program\Images\grape.gif")

End If

If c = 4 Then

Image1(2).Picture = LoadPicture("C:\My Folder\VB program\Images\cherry.gif")

End If

If c = 5 Then

Image1(2).Picture = LoadPicture("C:\My Folder\VB program\Images\orange.gif")

End If

End Sub